

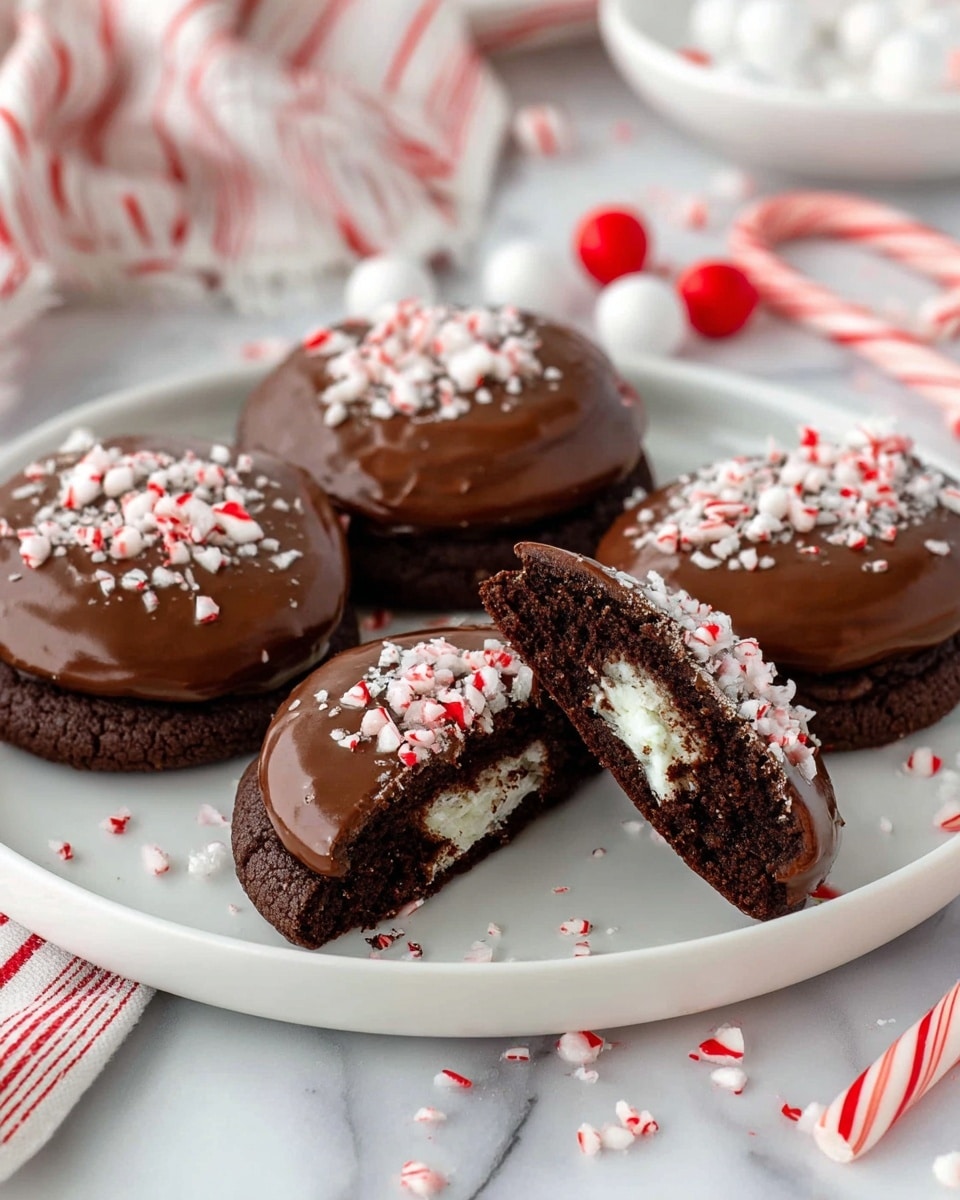
If you adore the cozy feeling of a warm mug of hot chocolate during the holidays, you’re going to fall head over heels for this Hot Cocoa Peppermint Cookies Recipe. These cookies capture everything we love about hot cocoa—the rich chocolatey base, the gooey marshmallow pockets, and the refreshing crunch of peppermint candies—all baked into delightful bite-sized treats. Perfectly soft yet slightly chewy, they make a sweet and festive addition to any cookie platter or a comforting snack with your favorite winter beverage.

Ingredients You’ll Need
Gathering the right ingredients is a breeze for this recipe, and each element plays a crucial role in delivering the iconic hot cocoa flavor and that magical peppermint twist. These simple pantry staples come together to create a cookie that’s both familiar and exciting.
- 1/2 cup unsalted butter, softened: Provides rich creaminess and a tender crumb texture.
- 1/2 cup granulated sugar: Adds sweetness and helps create a slight crunch on the edges.
- 1/2 cup packed brown sugar: Imparts moisture and a subtle caramel undertone.
- 1 large egg: Binds everything together and adds richness.
- 1 teaspoon vanilla extract: Enhances the overall flavor depth with warmth and sweetness.
- 1 cup all-purpose flour: The base structure of the cookie, giving it body and chew.
- 1/2 cup unsweetened cocoa powder: Delivers that deep, chocolate flavor synonymous with hot cocoa.
- 1 teaspoon baking soda: Helps the cookies rise and achieve a light texture.
- 1/4 teaspoon salt: Balances sweetness and amplifies chocolate notes.
- 1/2 cup chocolate chips: Bursts of melty chocolate chunks enhance indulgence.
- 1/2 cup mini marshmallows: Adds gooey softness, mimicking melted marshmallows in a cup of cocoa.
- 1/3 cup crushed peppermint candies or candy canes: Brightens up the cookie with refreshing minty crunch.
How to Make Hot Cocoa Peppermint Cookies Recipe
Step 1: Preheat and Prepare
Start by setting your oven to 350°F (175°C). Line a baking sheet with parchment paper to prevent sticking and ensure easy cleanup. This prep step is a small one but essential for perfect baking results every time.
Step 2: Cream Butter and Sugars
In a large mixing bowl, combine your softened butter with both the granulated and brown sugars. Beat them together until the mixture becomes light and fluffy—this usually takes a few minutes and builds the perfect base for tender cookies with just the right bite.
Step 3: Add Egg and Vanilla
Beat the egg and vanilla extract into your creamed butter and sugar mixture until everything is well combined. This step ensures your cookies have richness and a lovely, inviting aroma once baked.
Step 4: Combine Dry Ingredients
In a separate bowl, whisk together the flour, unsweetened cocoa powder, baking soda, and salt. This dry mix brings the trademark hot cocoa flavor with balance and helps your cookies achieve that perfect softness and chew.
Step 5: Mix Dry and Wet Ingredients
Gradually add the dry mixture to your wet ingredients, stirring just until everything is combined. Be careful not to overmix—this keeps your cookies tender and prevents them from becoming tough.
Step 6: Fold in Chocolate Chips, Marshmallows, and Peppermint
Now for the fun part: fold in the chocolate chips, mini marshmallows, and crushed peppermint candies. These goodies bring the recipe to life, making every bite a thrilling hot cocoa experience with a peppermint spark.
Step 7: Scoop and Bake
Scoop tablespoon-sized portions of dough onto your prepared baking sheet, spacing them about 2 inches apart to allow room for spreading. Bake for 9 to 11 minutes until the edges are set but centers remain soft and invitingly gooey. Let the cookies cool on the baking sheet for 5 minutes; this step helps them finish setting while maintaining that perfect chewy texture.
How to Serve Hot Cocoa Peppermint Cookies Recipe
Garnishes
For an eye-catching finish, sprinkle extra crushed peppermint candies and a few mini marshmallows on top of the cookies just before baking. This not only makes them look festive but adds an irresistible texture contrast that guests will love.
Side Dishes
These cookies pair beautifully with a warm mug of classic hot chocolate or peppermint mocha for an extra indulgent treat. A simple glass of cold milk or even a cup of black coffee also complements the bold chocolate and mint flavors wonderfully.
Creative Ways to Present
Try stacking your Hot Cocoa Peppermint Cookies Recipe cookies on a festive plate with a dusting of powdered sugar to mimic snowy magic. Or wrap them up in clear cellophane tied with a colorful ribbon—perfect for gifting during the holidays, guaranteed to bring smiles!
Make Ahead and Storage
Storing Leftovers
Keep any leftover cookies fresh by storing them in an airtight container at room temperature. They will stay wonderfully soft and flavorful for up to 5 days, making them ideal for a quick sweet snack after busy days or to share with friends.
Freezing
To enjoy these cookies later, freeze the dough balls before baking by placing them on a tray lined with parchment paper, then transfer to a freezer-safe bag once solid. You can also freeze fully baked cookies in an airtight container—both methods preserve freshness and flavor excellently.
Reheating
Warm your cookies gently in a microwave for 10 to 15 seconds or briefly in a low-temp oven to revive that freshly baked feel. The marshmallows soften delightfully when reheated, and the chocolate melts a bit, making every bite cozy and comforting.
FAQs
Can I use dark chocolate chips instead of regular ones?
Absolutely! Dark chocolate chips work beautifully in this Hot Cocoa Peppermint Cookies Recipe by adding a richer, more intense chocolate flavor that pairs perfectly with the peppermint and marshmallows.
What can I substitute for crushed peppermint candies?
If you don’t have peppermint candies on hand, you can use peppermint extract for flavor and chopped candy canes for texture. Alternatively, finely chopped mint chocolate bars also add a nice twist.
Are these cookies suitable for vegetarians?
Yes, this Hot Cocoa Peppermint Cookies Recipe is vegetarian-friendly as it contains no meat products. Just be sure your marshmallows do not contain gelatin if you strictly avoid animal products.
Can I make these cookies gluten-free?
To make these cookies gluten-free, swap the all-purpose flour with a gluten-free baking flour blend. It’s best to choose one that includes xanthan gum to mimic the structure gluten provides for the perfect texture.
How do I prevent marshmallows from melting too much during baking?
Mini marshmallows work best because they distribute evenly and retain a soft texture rather than fully melting. Adding extra marshmallows on top right before baking can help achieve that iconic gooey look without losing too much shape.
Final Thoughts
There’s something truly magical about the combination of chocolate, marshmallows, and peppermint, and this Hot Cocoa Peppermint Cookies Recipe brings all those flavors together in one irresistible treat. Whether you’re baking for the holidays or just because, these cookies are guaranteed to bring joy and warmth with every bite. I hope you enjoy making and sharing them as much as I do!
Print
Hot Cocoa Peppermint Cookies Recipe
- Prep Time: 15 minutes
- Cook Time: 10 minutes
- Total Time: 25 minutes
- Yield: 24 cookies
- Category: Dessert
- Method: Baking
- Cuisine: American
- Diet: Vegetarian
Description
These Hot Cocoa Peppermint Cookies combine the rich, chocolatey flavor of cocoa with festive peppermint and gooey mini marshmallows, making them an irresistible treat perfect for holiday gatherings or cozy winter days.
Ingredients
Cookie Dough
- 1/2 cup unsalted butter, softened
- 1/2 cup granulated sugar
- 1/2 cup packed brown sugar
- 1 large egg
- 1 teaspoon vanilla extract
Dry Ingredients
- 1 cup all-purpose flour
- 1/2 cup unsweetened cocoa powder
- 1 teaspoon baking soda
- 1/4 teaspoon salt
Add-ins
- 1/2 cup chocolate chips
- 1/2 cup mini marshmallows
- 1/3 cup crushed peppermint candies or candy canes
Instructions
- Preheat Oven: Preheat your oven to 350°F (175°C) and line a baking sheet with parchment paper to ensure cookies don’t stick during baking.
- Cream Butter and Sugars: In a large mixing bowl, cream together the softened butter, granulated sugar, and brown sugar until the mixture is light and fluffy, which helps create a tender cookie texture.
- Add Egg and Vanilla: Beat in the egg and vanilla extract until they are fully incorporated, adding moisture and flavor to the dough.
- Combine Dry Ingredients: In a separate bowl, whisk together the all-purpose flour, unsweetened cocoa powder, baking soda, and salt to evenly distribute the leavening agent and cocoa.
- Mix Dry and Wet Ingredients: Gradually add the dry ingredients to the wet mixture, mixing just until combined to avoid overworking the dough and tough cookies.
- Fold in Add-ins: Gently fold in the chocolate chips, mini marshmallows, and crushed peppermint candies, ensuring they are evenly distributed throughout the dough.
- Shape Cookies: Scoop tablespoon-sized portions of dough onto the prepared baking sheet, spacing them about 2 inches apart to allow for spreading during baking.
- Bake: Bake the cookies for 9 to 11 minutes, or until the edges are set but the centers remain soft, giving a chewy texture.
- Cool: Allow the cookies to cool on the baking sheet for 5 minutes before transferring them to a wire rack to cool completely, which helps them set.
Notes
- Add extra marshmallows and peppermint pieces on top before baking for a more festive look.
- Store cookies in an airtight container at room temperature for up to 5 days to maintain freshness.
- For a richer chocolate flavor, substitute dark chocolate chips or chunks instead of regular chocolate chips.


