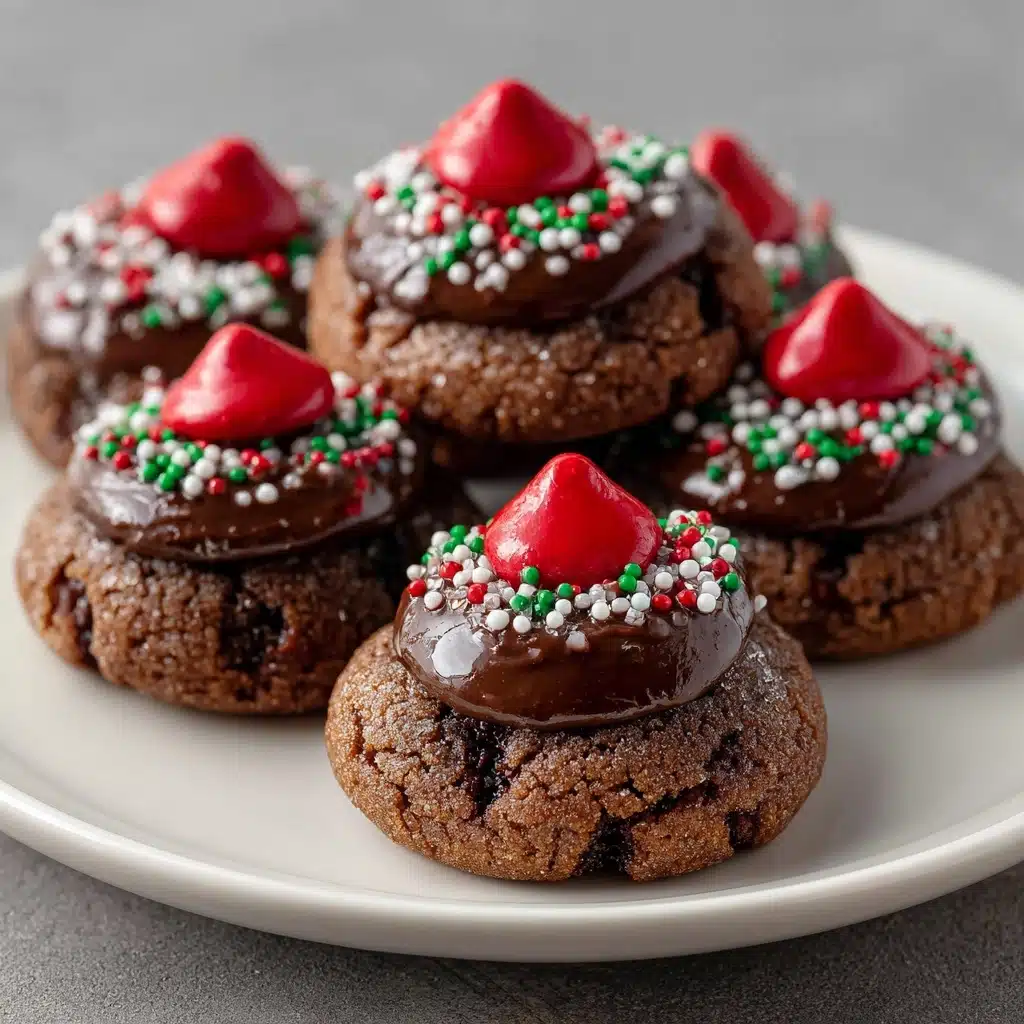
If you’re searching for the ultimate crowd-pleaser, look no further than these Chocolate Kiss Cookies. Each bite begins with a tender cocoa-rich base, delicately coated in sugar for sparkle, and crowned with a glossy chocolate kiss at its heart. Perfect for the holidays, potlucks, or any moment you feel like sharing a little joy, this recipe is as easy as it is impressive—the kind of cookie people will ask you for again and again!
Ingredients You’ll Need
The secret to unforgettable Chocolate Kiss Cookies is all in the balance of simple, quality ingredients. Each one is chosen to bring out the best in chocolate, creating a cookie with the perfect texture and irresistible flavor. Here’s what you’ll need and why it matters:
- Unsalted butter, softened: This creates an ultra-tender texture and lets you control the saltiness in your dough.
- Granulated sugar: Sweetens the dough and adds sparkle when rolled on the outside before baking.
- Vanilla extract: Adds a lovely aromatic depth that complements both chocolate and butter.
- All-purpose flour: Gives structure to the cookies while keeping them light.
- Unsweetened cocoa powder: Provides a deep chocolate flavor and rich color (choose your favorite kind, whether Dutch process or natural).
- Baking soda: Ensures the cookies bake up just right—not too flat, not too puffy.
- Salt: Balances and brightens all the sweet, chocolatey notes.
- Milk: Binds the dough together and keeps it moist (just a touch is all you need).
- Chocolate kiss candies, unwrapped: The iconic finishing touch—choose classic milk chocolate or experiment with flavored varieties.
- Additional granulated sugar for rolling: Gives each cookie a gorgeous, sweet crust that cracks just so in the oven.
How to Make Chocolate Kiss Cookies
Step 1: Prepare Your Baking Sheets
Start by preheating your oven to 350°F (175°C) and lining your baking sheets with parchment paper. This ensures that your Chocolate Kiss Cookies bake evenly and lift off the pan perfectly golden, never sticking or over-browning on the bottoms.
Step 2: Cream the Butter and Sugar
In a large mixing bowl, blend your softened butter and granulated sugar together until light and fluffy—this usually takes a few minutes and is key for cookies that are tender and slightly chewy. Add in the vanilla extract and mix well so that each bite is deeply aromatic and flavorful.
Step 3: Mix the Dry Ingredients
In a separate bowl, whisk together your flour, cocoa powder, baking soda, and salt. This quick step keeps your Chocolate Kiss Cookies evenly mixed, preventing unpleasant lumps or pockets of dry cocoa so every cookie turns out just right.
Step 4: Combine Everything Into a Dough
Gradually add the dry ingredients to the creamed mixture, mixing just until combined. Stir in the milk to bring the dough together—it may look thick, but that’s exactly what you want. The finished dough should be easy for you to form into balls.
Step 5: Shape and Roll the Cookies
Roll the dough into 1-inch balls, then coat each one generously in granulated sugar. This extra step is what gives Chocolate Kiss Cookies their signature crackle and sweetness on the outside, making them truly irresistible.
Step 6: Bake to Perfection
Arrange the sugared dough balls on your prepared baking sheets, leaving about 2 inches between each one. Bake for 8–10 minutes—just until the cookies are set and look slightly crackled on top. You want them to stay soft, so keep an eye on them!
Step 7: Add the Chocolate Kiss
As soon as the cookies come out of the oven, immediately press a chocolate kiss candy into the center of each warm, soft cookie. The heat will partially melt the chocolate, helping it fuse perfectly to the cookie without losing its shape. Let the cookies cool on the baking sheet for 5 minutes before transferring to a wire rack to cool completely. This gives them time to firm up without losing their delicate texture.
How to Serve Chocolate Kiss Cookies

Garnishes
Want to dress up your Chocolate Kiss Cookies a little more? Try a light dusting of powdered sugar or a drizzle of melted chocolate over the top for extra flair. For the holidays, a sprinkle of crushed peppermint candies adds both color and a cool twist.
Side Dishes
Pair these cookies with an ice-cold glass of milk, or make them part of a dessert platter with fresh strawberries and bowl of whipped cream for dipping. They’re just as wonderful alongside a mug of rich coffee or a pot of herbal tea—perfect for any cookie tray or gathering.
Creative Ways to Present
Stack the cookies in clear cellophane bags tied with festive ribbon for party favors or edible gifts. For a fun dessert board, arrange Chocolate Kiss Cookies with an assortment of other bite-size treats and fresh fruit. You can even skewer a few on lollipop sticks for a playful, kid-friendly twist!
Make Ahead and Storage
Storing Leftovers
Store any leftover Chocolate Kiss Cookies in an airtight container at room temperature. They’ll stay soft and flavorful for up to 5 days, making them great for baking ahead before events or keeping in your cookie jar for afternoons when you need a sweet pick-me-up.
Freezing
To freeze, let the cookies cool completely, then arrange in a single layer in an airtight container or freezer bag. They’ll keep beautifully for up to 2 months. You can also freeze unbaked dough balls (without the sugar coating) and bake straight from the freezer—just add an extra minute or two to the baking time.
Reheating
If you like your Chocolate Kiss Cookies warm, just pop a cookie in the microwave for 7–10 seconds. It’ll soften the cookie and slightly melt the chocolate kiss, making it taste perfectly fresh from the oven.
FAQs
Can I use margarine or salted butter instead of unsalted butter?
You can use salted butter if that’s what you have on hand, but you might want to reduce the added salt slightly to keep the flavor balanced. Margarine also works, though it can change the final texture a bit—expect your cookies to spread a little more.
What kind of cocoa powder is best for Chocolate Kiss Cookies?
Both natural and Dutch process cocoa powder taste delicious here. Dutch process will give you a slightly deeper color and milder flavor, whereas natural cocoa makes the cookies taste a touch fruitier and more robust.
Can I add nuts or other mix-ins to this recipe?
Absolutely! Chopped toasted pecans or walnuts are a lovely addition for extra crunch. Just make sure not to add too many, so your cookies still hold their shape and each gets its crown of chocolate.
How do I keep the chocolate kisses from melting or losing shape?
Press the kisses into the cookies while they’re warm, but let the cookies cool fully before stacking or storing them. If you live somewhere hot, you can even pop the trays of finished cookies into the fridge for a few minutes to help set the chocolate quickly.
Can I make Chocolate Kiss Cookies ahead of time for a party?
Yes! You can bake the cookies the day before and store in an airtight container, or even freeze them weeks in advance. They taste amazing even after a day or two, so they’re perfect for prepping ahead for busy holiday baking sessions.
Final Thoughts
Chocolate Kiss Cookies are simple, classic, and guaranteed to spark smiles wherever you share them. Whether you’re baking with kids, preparing a holiday platter, or just treating yourself to something sweet, this recipe is always a winner. Give these cookies a try—you’ll be amazed at how quickly they disappear!
Print
Chocolate Kiss Cookies Recipe
- Prep Time: 20 minutes
- Cook Time: 10 minutes
- Total Time: 30 minutes
- Yield: 48 cookies
- Category: Dessert
- Method: Baking
- Cuisine: American
- Diet: Vegetarian
Description
Indulge in these delectable Chocolate Kiss Cookies that are perfect for any occasion. A rich cocoa dough envelops a sweet chocolate kiss, creating a delightful treat that will satisfy any sweet tooth.
Ingredients
Dough:
- 1 cup unsalted butter, softened
- 1 cup granulated sugar
- 1 teaspoon vanilla extract
- 2 cups all-purpose flour
- ½ cup unsweetened cocoa powder
- ½ teaspoon baking soda
- ¼ teaspoon salt
- 2 tablespoons milk
Additional:
- 48 chocolate kiss candies, unwrapped
- Additional granulated sugar for rolling
Instructions
- Preheat Oven: Preheat the oven to 350°F (175°C) and line a baking sheet with parchment paper.
- Cream Butter and Sugar: In a large mixing bowl, cream the butter and sugar until light and fluffy. Mix in the vanilla extract.
- Combine Dry Ingredients: In a separate bowl, whisk together the flour, cocoa powder, baking soda, and salt. Gradually add to the creamed mixture and mix until just combined.
- Add Milk: Stir in the milk to bring the dough together.
- Form Dough: Roll the dough into 1-inch balls, then roll each ball in granulated sugar.
- Bake: Place the balls on the prepared baking sheet and bake for 8–10 minutes until set.
- Add Kisses: Press a chocolate kiss into the center of each warm cookie. Cool on the baking sheet before transferring to a wire rack to cool completely.
Notes
- For extra flavor, try adding a drop of peppermint extract to the dough or using flavored chocolate kisses like almond or caramel.
- Store cookies in an airtight container for up to 5 days.

